Search This Blog

Tuesday, June 7, 2022

Python with Gmail - post May 2022 'less secure' option removed

 https://www.abstractapi.com/guides/sending-email-with-python


Useful article on how to get Gmail to work with Python post May 2022 when the "Less Secure" app access was turned off.

Easiest method is to turn on 2FA and then create an application password.


=========

[  Back up of the important text from the link above ] 

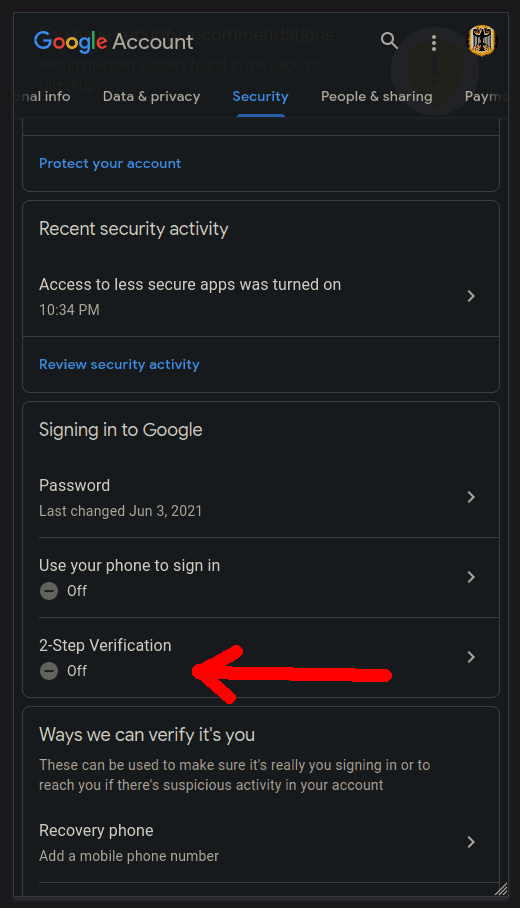
Two-factor Authentication

In order to allow our Python client script to access Gmail accounts we will enable two-factor authentication (2FA) which Google calls "2-step verification".

With 2FA you add an extra layer of security to your account in case your password is stolen. After you set it up, you’ll sign in to your account in two steps using:
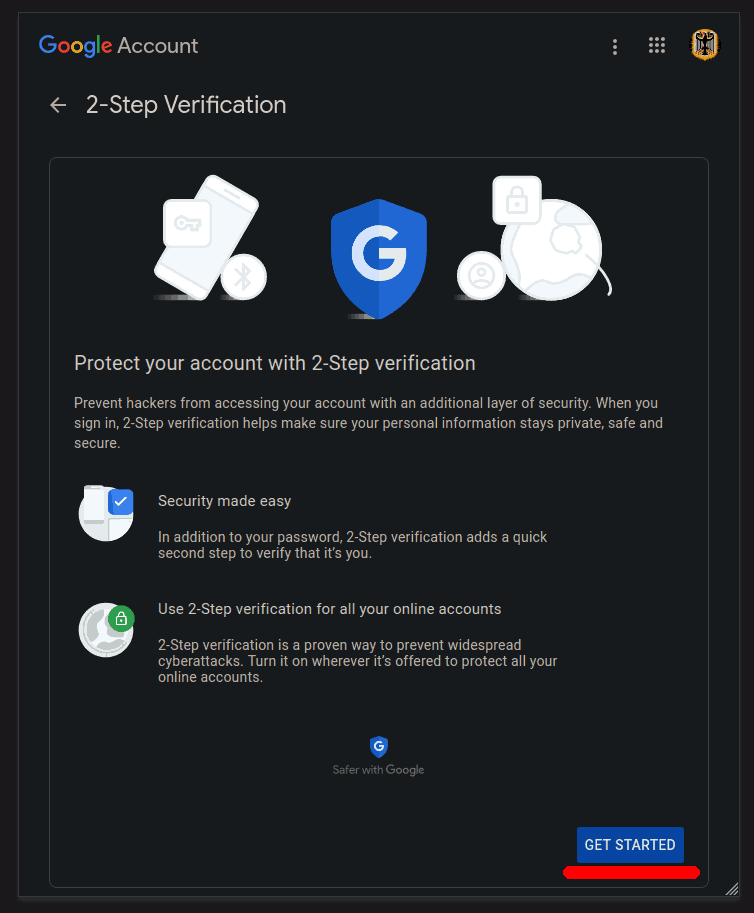
  • something you know, like your password and
  • something you have, like your phone.

To enable 2FA:

  1. Open your Google Account.
  2. In the navigation panel, select Security.
  3. Under “Signing in to Google,” select 2-Step Verification
Signing in to Google: 2-step Verification
Signing in to Google: 2-step Verification (close-up)

Click the blue GET STARTED button:

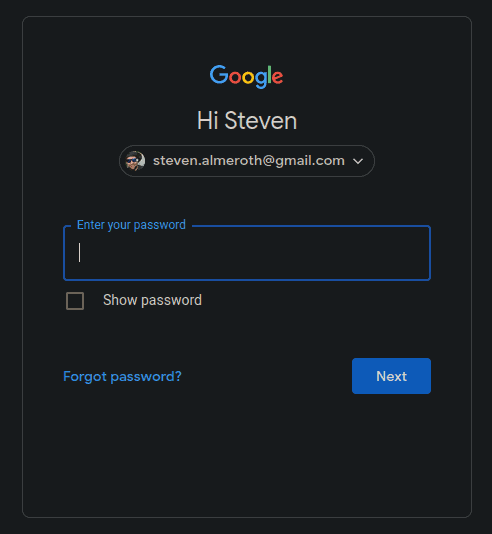
Login using your password. Make sure you are using the right account.

Google login

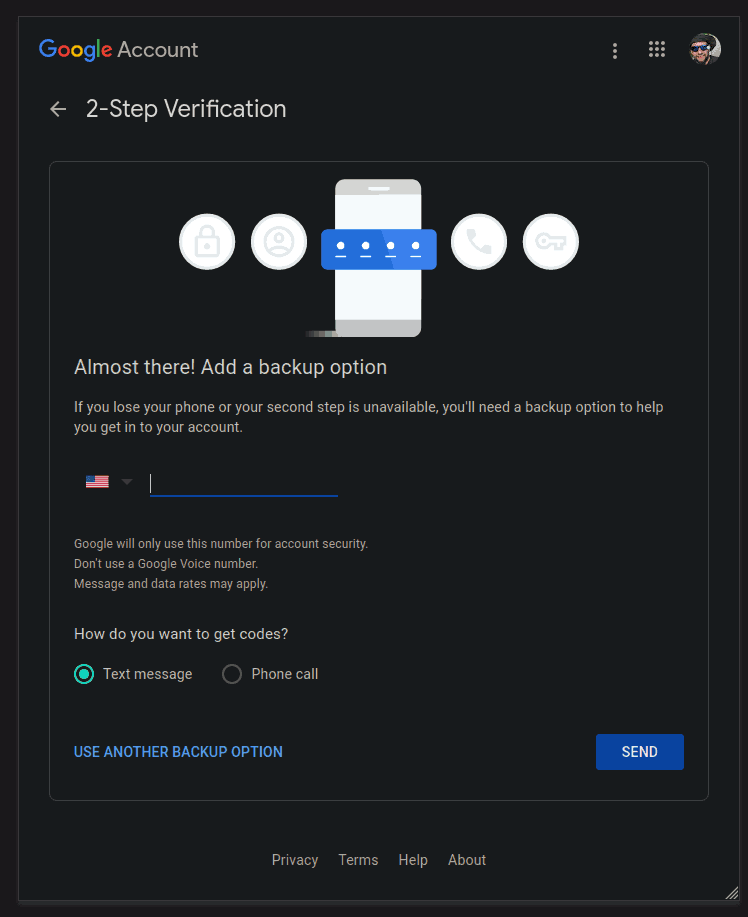
Enter your phone number and click SEND:

Phone number

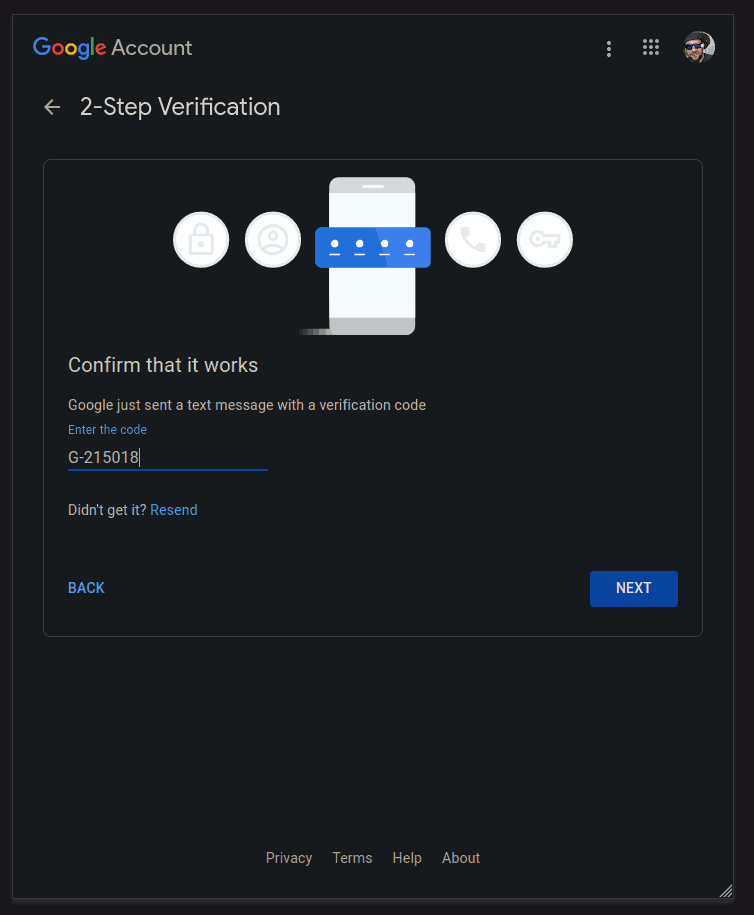
Wait for the confirmation code to arrive and enter it in:

Confirmation code

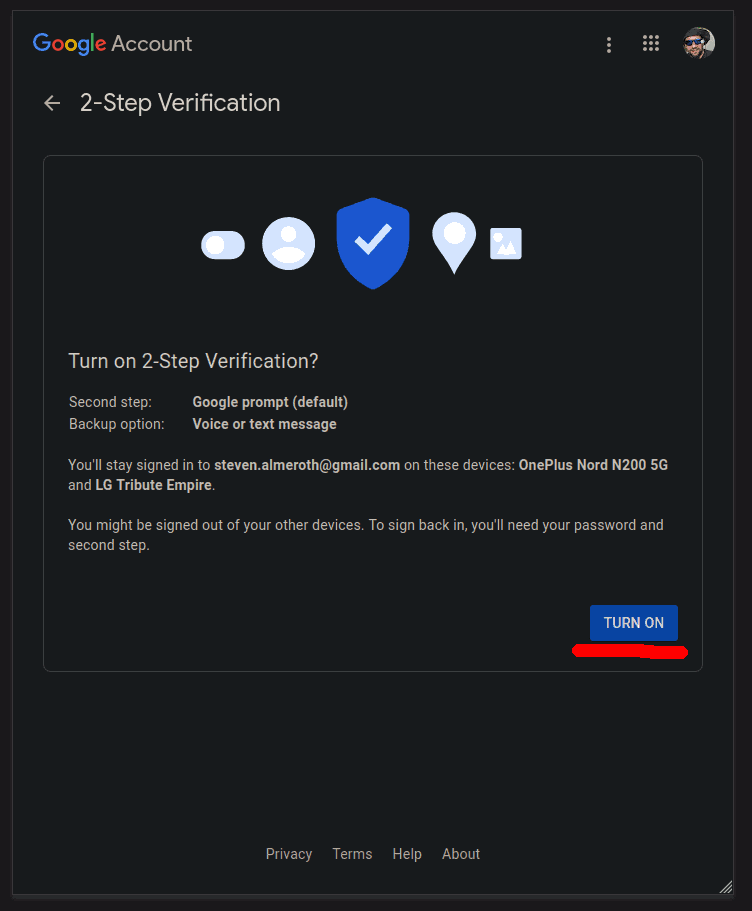
Click the TURN ON button:

Turn on

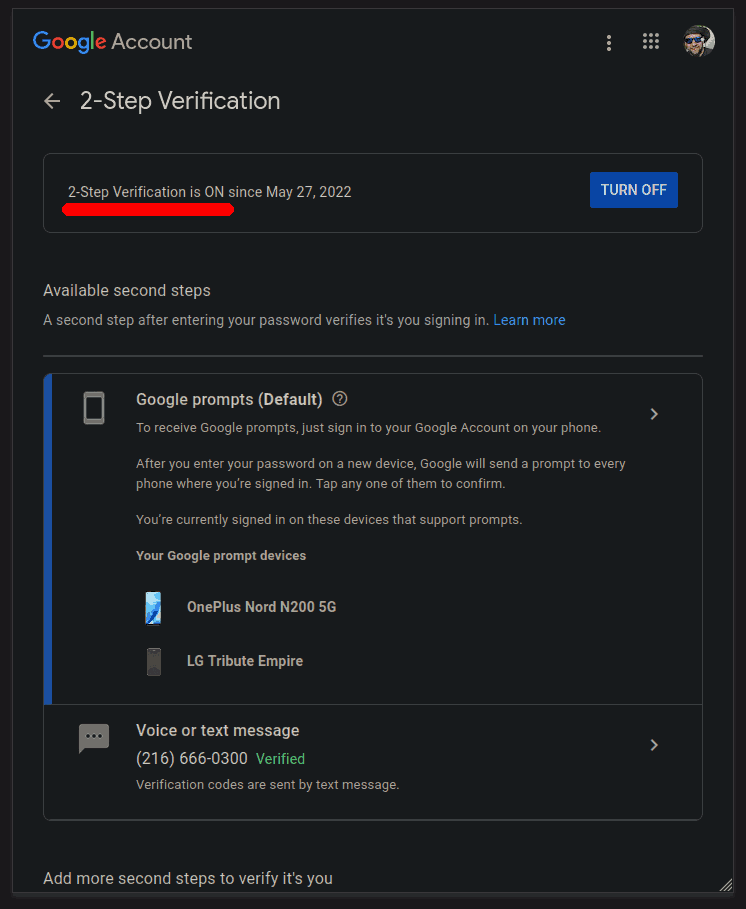
2FA should now be enabled:

2FA on

App Passwords

Now we will generate a special password that our app can use as the 2-step verification.

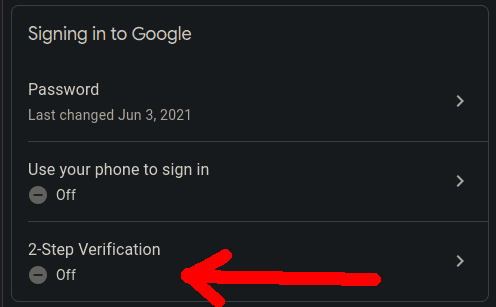
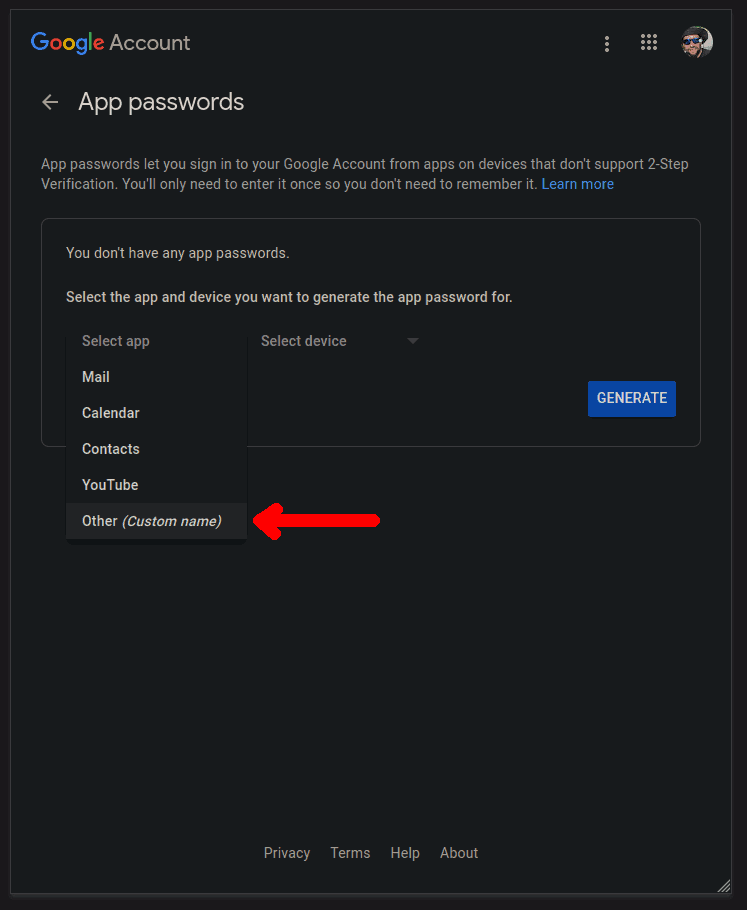
Back in the Signing in to Google panel select "App passwords" to add a new password:

App passwords: none

Under the "Select app" drop-down select "Other":

App passwords: other

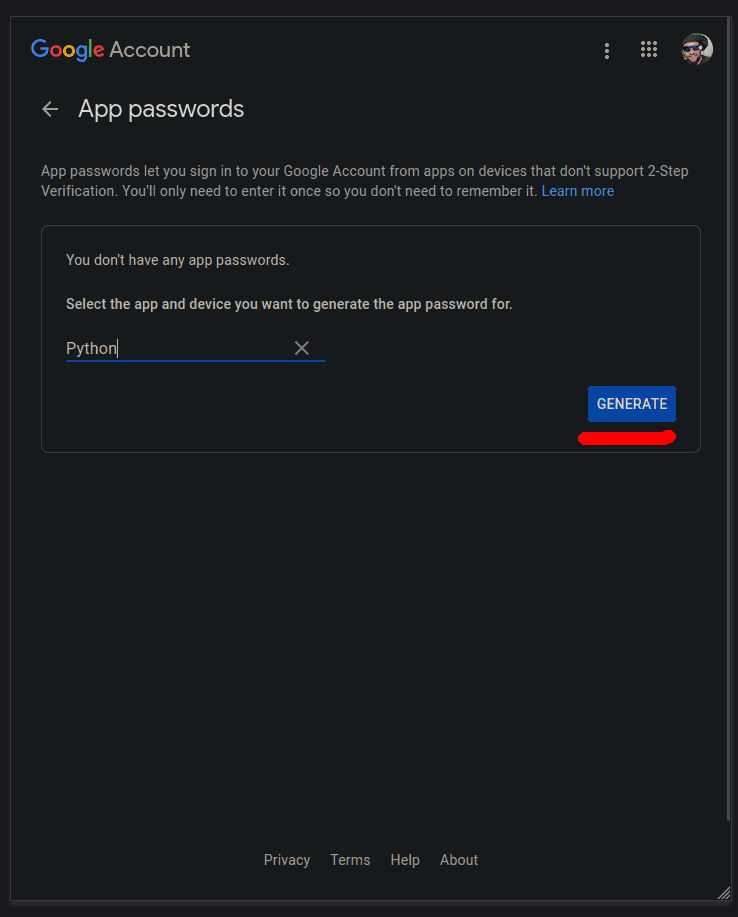
Give your app a name and click GENERATE:

App passwords: generate

Write down (copy to clipboard) your generated password to use in the app:

App password: generated

We should now have our generated app password:

App password: list

Script: Plain Text

Create a file called "gmail.py" and enter the following script:


import smtplib
import ssl

ctx = ssl.create_default_context()
password = "qwertyuiopasdfgh"    # Your app password goes here
sender = "somename@gmail.com"    # Your e-mail address
receiver = "recipient@gmail.com" # Recipient's address
message = """
Hello from Python.
"""

with smtplib.SMTP_SSL("smtp.gmail.com", port=465, context=ctx) as server:
    server.login(sender, password)
    server.sendmail(sender, receiver, message)

The code above creates a secure connection with Gmail’s SMTP server using Secure Sockets Layer encryption (SSL) and automatically upgrades it to TLS. Passing in the context from the create_default_context() function will load the system’s trusted CA certificates, enable certificate validation and hostname checking and try to choose reasonably secure protocol and cipher settings.

Notice how the message variable actually contains a newline as the first character.

Note: Be sure to fill in your: password, sender and receiver strings.

Save the file and go to your terminal and run the script:

Thursday, September 30, 2021

Coral TPU for Computer Vision on Raspberry Pi

 The CORAL TPU can be used to speed up Tensorflow on the RPi to give a fairly reasonable rate for computer vision tasks such as object detection, pose estimation, speech recognition.

For examples see:  https://coral.ai/models/object-detection/ 


Assuming Python3 is already installed.....

Install Tensorflow Lite

echo "deb https://packages.cloud.google.com/apt coral-edgetpu-stable main" | sudo tee /etc/apt/sources.list.d/coral-edgetpu.list
curl https://packages.cloud.google.com/apt/doc/apt-key.gpg | sudo apt-key add -
sudo apt-get update
sudo apt-get install python3-tflite-runtime

Source info: https://www.tensorflow.org/lite/guide/python


Install Python Coral

sudo apt-get install python3-pycoral


Clone the Coral Examples into a new folder

mkdir pycoral

cd pycoral

git clone https://github.com/google-coral/pycoral.git

source: https://github.com/google-coral/pycoral 


Clone the test data:

git clone https://github.com/google-coral/test_data.git


Give it a go with an image:

pi@pi3:~/code/pycoral/pycoral $ python3 examples/detect_image.py   --model test_data/ssd_mobilenet_v2_coco_quant_postprocess_edgetpu.tflite   --labels test_data/coco_labels.txt   --input ~/images/20211001/images/A21100100192512.jpg


----INFERENCE TIME----

Note: The first inference is slow because it includes loading the model into Edge TPU memory.

274.20 ms

81.01 ms

91.19 ms

72.09 ms

69.50 ms

-------RESULTS--------

car

  id:     2

  score:  0.671875

  bbox:   BBox(xmin=-6, ymin=138, xmax=697, ymax=560)

car

  id:     2

  score:  0.6171875

  bbox:   BBox(xmin=97, ymin=220, xmax=1165, ymax=975)

Thursday, February 18, 2021

Moving PostgreSQL WAL file to a new drive on an Ubuntu server

Sometimes you may need to move PostgreSQL's WAL (write ahead log) file to a new drive. For example to gain better speed if you put it on an SSD or NVME drive, or to gain additional space.


First stop PostgreSQL service:

sudo service postgresql stop

Now make a new folder on the new drive, and move (or copy if have room) the pg_wal directory across:


mkdir -p /mnt/newdrive/pg_wal
su postgres
cp /var/lib/postgresql/11/main/pg_wal/* /mnt/newdrive/pg_wal/

Make a back up for now of the WAL directory:

mv /var/lib/postgresql/11/main/pg_wal   /var/lib/postgresql/11/main/pg_wal_bck

Create a link and start the DB again:
ln -s /mnt/newdrive/pg_wal /var/lib/postgresql/11/main/pg_wal
sudo service postgresql start

psql -U postgres -W
 >> should now ask for your password and you can log in

Any issues check the LOG file:


tail postgresql/postgresql-11-main.log -n 100


When you are happy it's all working then you can remove the WAL back up directory:
rmdir -r /var/lib/postgresql/11/main/pg_wal_bck


Notes:


any permission issues try chown to postgres and chmod 777 on the new dir

sudo chown postgres /mnt/newdrive/pg_wal

sudo chmod 777 /mnt/newdrive/pg_wal

Saturday, February 6, 2021

sudo apt-get update error for older Ubuntu (e.g. Ubuntu 19)


For older Ubuntu where you get an error when:

sudo apt-get update

E: The repository 'http://security.ubuntu.com/ubuntu eoan-security Release' no longer has a Release file. 


Try this:

sudo sed -i -re 's/([a-z]{2}\.)?archive.ubuntu.com|security.ubuntu.com/old-releases.ubuntu.com/g' /etc/apt/sources.list

then try
 sudo apt-get update

Thursday, February 4, 2021

Audible to MP3

It's frustrating when you purchase an audio book on Audible but can then only play it back from their apps - which isn't possible if you want to put it on a basic MP3 player to take jogging, cycling, etc.

To get around this you can strip away the DRM using your activation code. So this isn't cracking the code but just removing it, meaning you need to know your own 4bit Audible key.

Steps:

1) download the .aax file from your Audible account

2) use this tool to find your key  (drag the .aax file to this page and copy the key it returns)

https://audible-tools.github.io/ 


3) Install ffmpeg on your PC and then run this command:


ffmpeg -activation_bytes your-key-here -i input.aax -vn -c:a copy output.mp4

where you switch your-key-here to the value you got from the web tool, and the input.aax to the filename of the .aax you downloaded. This generates an output MP4 file in a few seconds which is free from the DRM. 

Now you can move it to any suitable player! 


---

Shell script to chop .aax into mp3 chapters

#!/bin/bash
# Author: http://crunchbang.org/forums/viewtopic.php?id=38748#p414992
# m4bronto
#     Chapter #0:0: start 0.000000, end 1290.013333
#       first   _     _     start    _     end
while [ $# -gt 0 ]; do
ffmpeg -i "$1" 2> tmp.txt
while read -r first _ _ start _ end; do
  if [[ $first = Chapter ]]; then
    read  # discard line with Metadata:
    read _ _ chapter
    
    ffmpeg -vsync 2 -i "$1" -ss "${start%?}" -to "$end" -vn -ar 44100 -ac 2 -ab 128  -f mp3 "$chapter.mp3" </dev/null
  fi
done <tmp.txt
rm tmp.txt
shift
done

Monday, May 11, 2020

Apache on Linux using Python3 via CGI


QUICK guide to enabling Python on an Apache2 Linux server


Assuming Python3 and Apache2 are installed on Ubuntu server.


Firstly enable CGI on Apache|:

sudo a2enmod cgi


Next configure Apache2 for the relevant website:

sudo nano /etc/apache2/sites-enabled/000-default.conf

add the following after the VirtualHosts line:


< Directory /var/www/html> 
Options +ExecCGI   
DirectoryIndex index.py
</ Directory>   
AddHandler cgi-script .py

Now create a test Python script and put it into the folder listed (e.g. /var/www/html).
Import CGI and enable as in demo below.

This script will return the parameters passed to the page, then numbers 1 to 100 and end of pg msg.

  GNU nano 4.3                                      test.py                                                 
#!/usr/bin/python3

import cgitb
import cgi
cgitb.enable()

cgitb.enable(display=1, logdir="/var/log/apachepy")

print("Content-Type: text/html;charset=utf-8")
print()


arguments = cgi.FieldStorage()

for i in arguments.keys():
    print (arguments[i].value)

print ('
'
)

print (arguments['imgurl'].value)


for in in range (0,100):
    print (i + '
')

print ('--end of demo---')


Finally test the page by going to your browser... then put in the URL such as
http://myurl/test.py?img='www.bbc.com/123.jpg'


Thursday, April 9, 2020

Example of adding an href link to marker in Leaflet to pass value to PHP page as parameter


Simple example of how to send marker ID to a PHP page


var map = L.map("map").setView([48.86, 2.35], 12);

    attribution: '© http://osm.org/copyright">OpenStreetMap> contributors'
}).addTo(map);

var myFeatureGroup = L.featureGroup().addTo(map).on("click", groupClick);
var marker, test;

for (var i = 0; i < 20; i += 1) {
  test = " link ";
  marker = L.marker(getRandomLatLng()).addTo(myFeatureGroup).bindPopup(test);
  marker.test = test;
}

function groupClick(event) {
  console.log("Clicked on marker " + event.layer.test);
}

function getRandomLatLng() {
  return [
    48.86 + 0.1 * Math.random() - 0.05,
    2.35 + 0.1 * Math.random() - 0.05
  ];
}